How to Use HT Work Focus – A Quick Start Guide
Learn how to track time and benefit your productivity in just a few minutes
Getting Started
- Learn how to configure remote access on a single network after installation—read the guide here.
- For remote access outside a single network, we recommend using our other software, HT Task Vector, which includes an Internet-based dashboard.
- If you're not using a terminal server, you must install HT Work Focus on each computer you want to manage. Remote access becomes available only after installation.
- By default, the program does not block any activity. You'll need to configure the Rules based on your preferences.
Click to enlarge
Reports
HT Work Focus begins tracking time and activities automatically upon installation. It starts every time the computer is turned on; working in the background, recording activities, and blocking unwanted.
Get live visual time reports of time worked and wasted. Use time logs to stay organized and in control. Learn how much of a day your employees spend working at your computer.
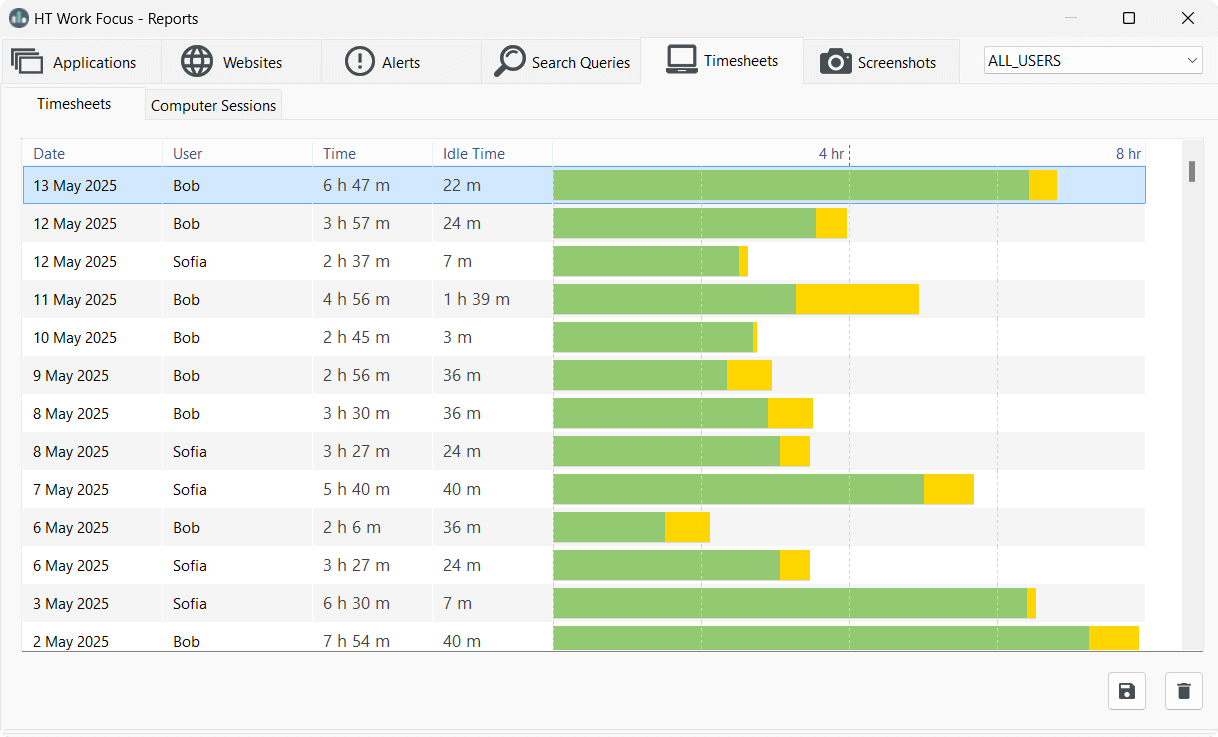
Click to enlarge
Identify and eliminate inefficient habits. See how much time you or your employees spent on each website and application. Learn where your team can waste time using the reports and limit or block these activities with the Rules.
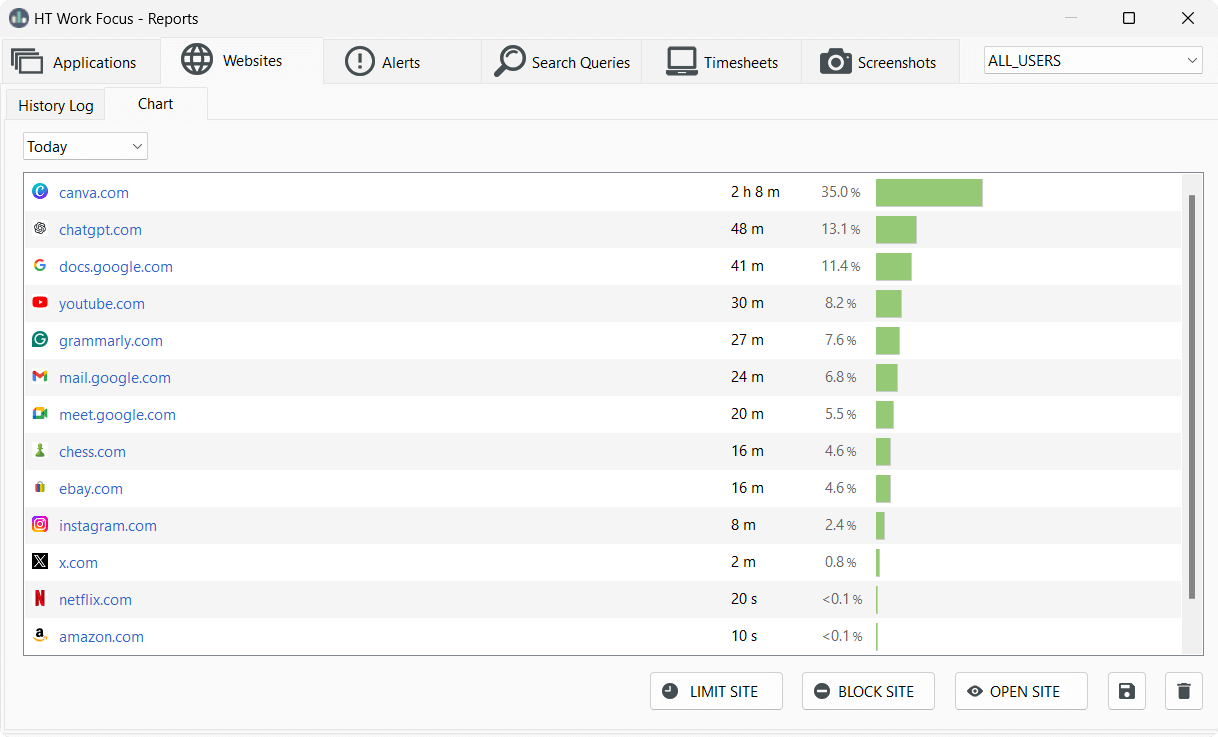
Click to enlarge
See Screenshots for a more detailed view. Every 5, 10, or 15 minutes, HT Work Focus captures your team members’ computer screens. That way, you can see how the time is spent and what everyone is working on.
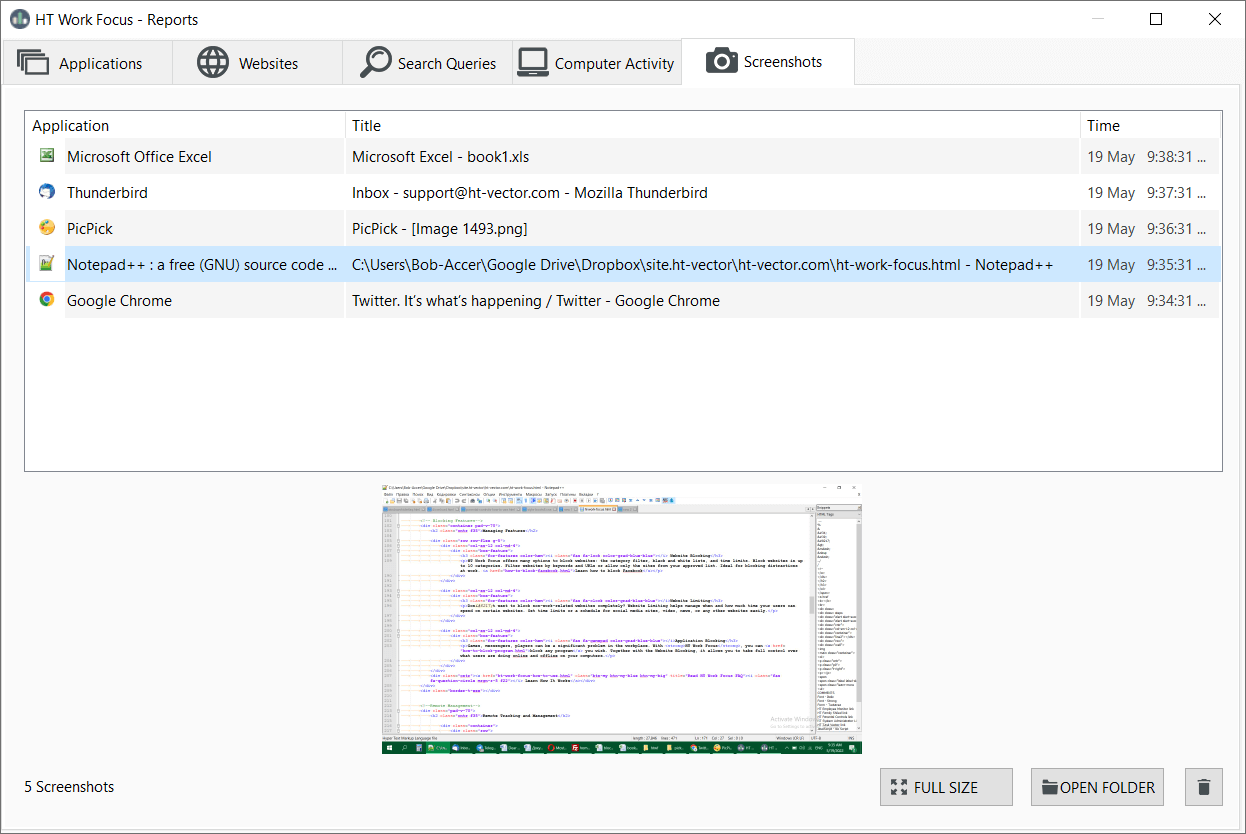
Click to enlarge
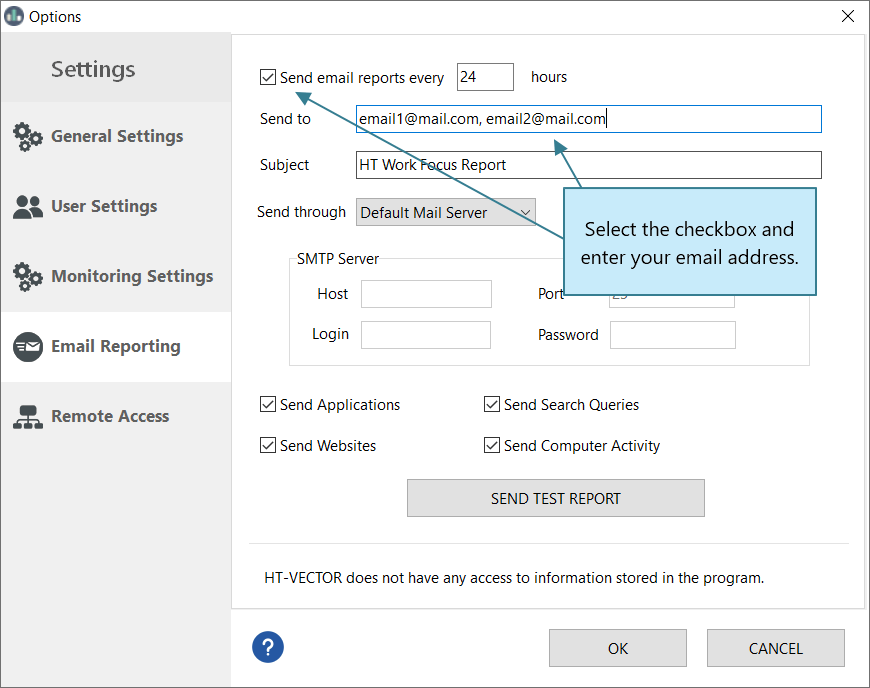
Get regular automatic email reports with time logs and computer activities.
- Open Settings → Email Reporting.
- Select Send email reports every and specify periodicity.
- Add your email address.
Click to enlarge
Rules
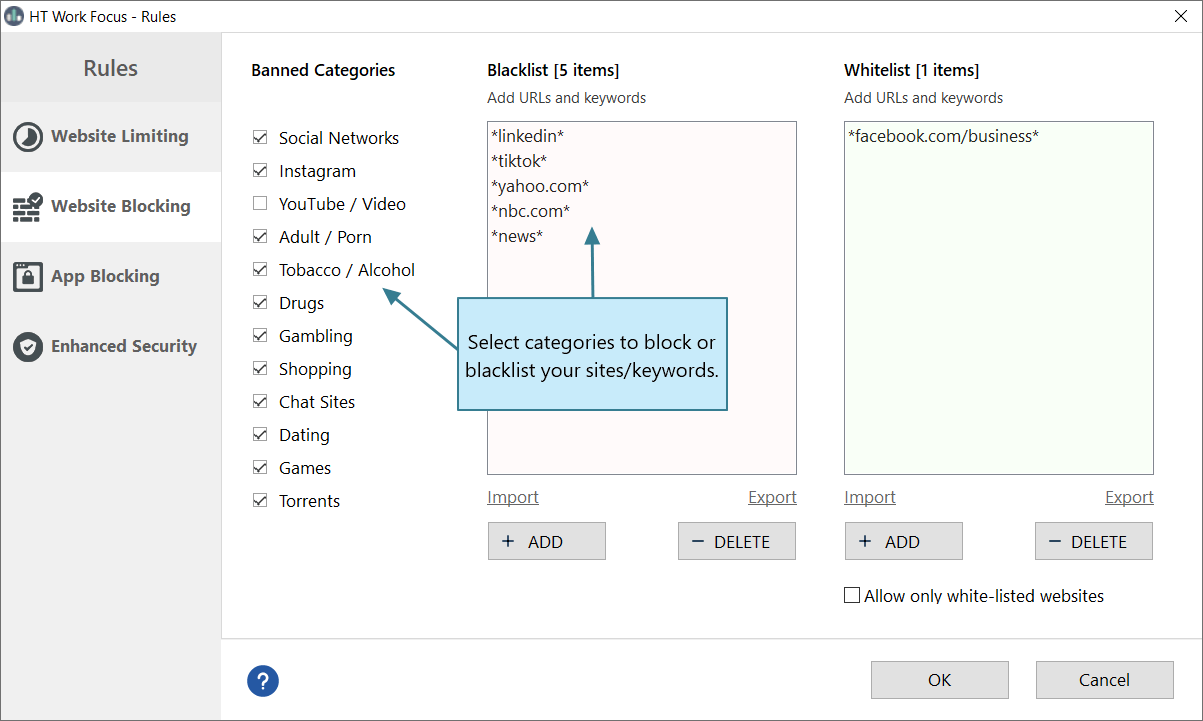
Boost productivity by blocking time-wasting websites such as news, social media, video, etc. Do not forget to block inappropriate content — adult websites and other sites with 10 categories. Block thousands of sites with a single checkbox or keyword.
- Go to Rules → Website Limits.
- Select Block for any unwanted web categories (like Adult or Gambling).
- In the Custom List, click Add Site, enter the website or keyword, and set it to Block.
- Blocked items will be completely inaccessible.
Click to enlarge
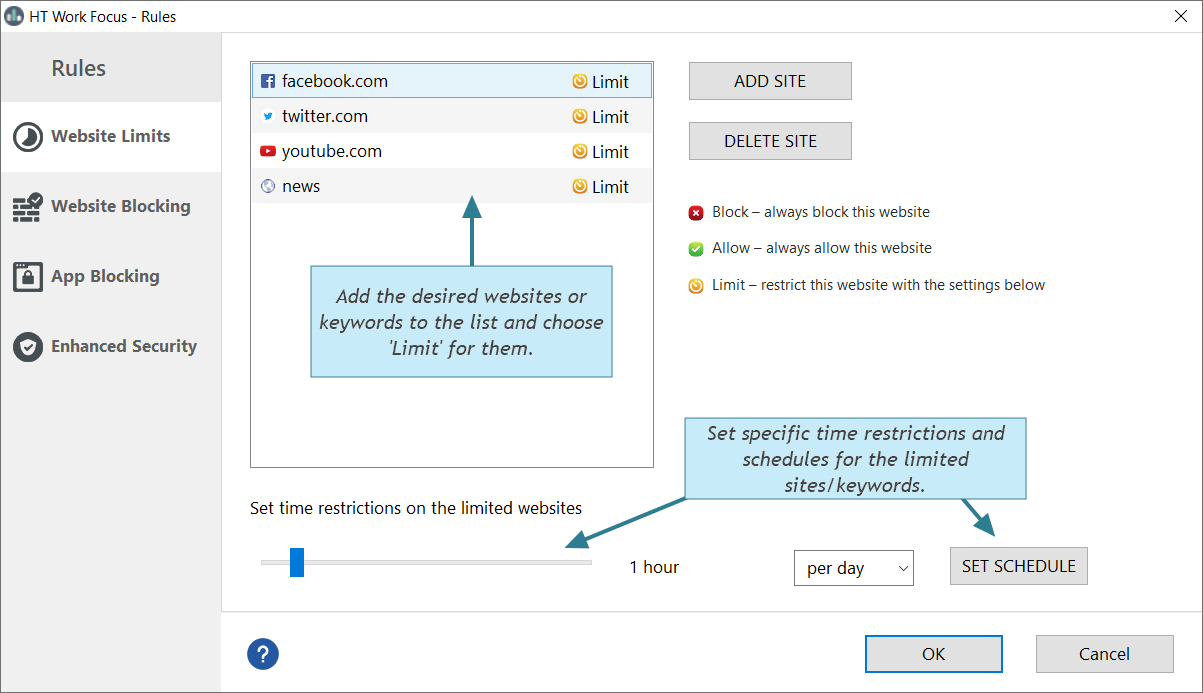
Instead of blocking, you can limit access to time-wasting sites. This helps manage distractions while still allowing short breaks. Example: Let your team enjoy a short chess game or scroll Instagram—without losing hours of productivity.
- Click Rules → Website Limits.
- Select Limit for non-work categories (like YouTube or Social Media).
- In the Custom List, add specific websites/keywords and set them to Limit.
- Set daily time limits or create a custom schedule.
Block: Access is completely denied at all times.
Limit: Access time is capped per day. The daily quota is shared across all items marked as Limit.
Click to enlarge
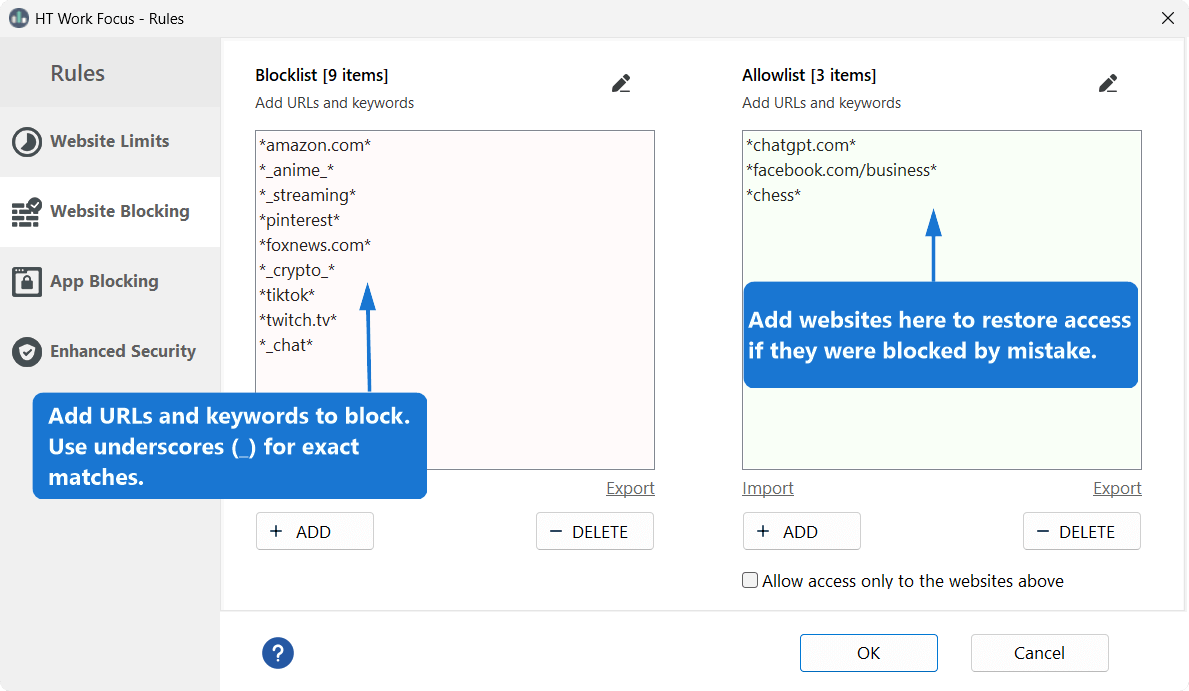
Use the Website Blocking tab to block certain websites or keywords. If something gets blocked by mistake, you can easily restore access using the allowlist.
- Go to Rules → Website Blocking.
- Blocklist
Add websites or keywords to the Blocklist to block them completely.
Example: Adding _streaming_ will block any site with the word “streaming” in the URL or title.
Tip: Use underscores for exact matches to prevent overblocking. For example, _keyword_ will only block pages where “keyword” stands alone. Without underscores, all pages containing any part of the word (e.g., xxxKeywordxxx) may also be blocked. - Allowlist:
Use the Allowlist to prevent overblocking. If a website you don’t intend to block gets blocked, simply add it here to restore access.
Example: If you block *chat*, it might also block chatgpt.com. To allow it, add chatgpt.com to the Allowlist. - For information on using Allowlist Mode, see the next section.
Click to enlarge
You can block unsupported browsers, click Rules → App Limits, and select Block for Unsupported Browsers.
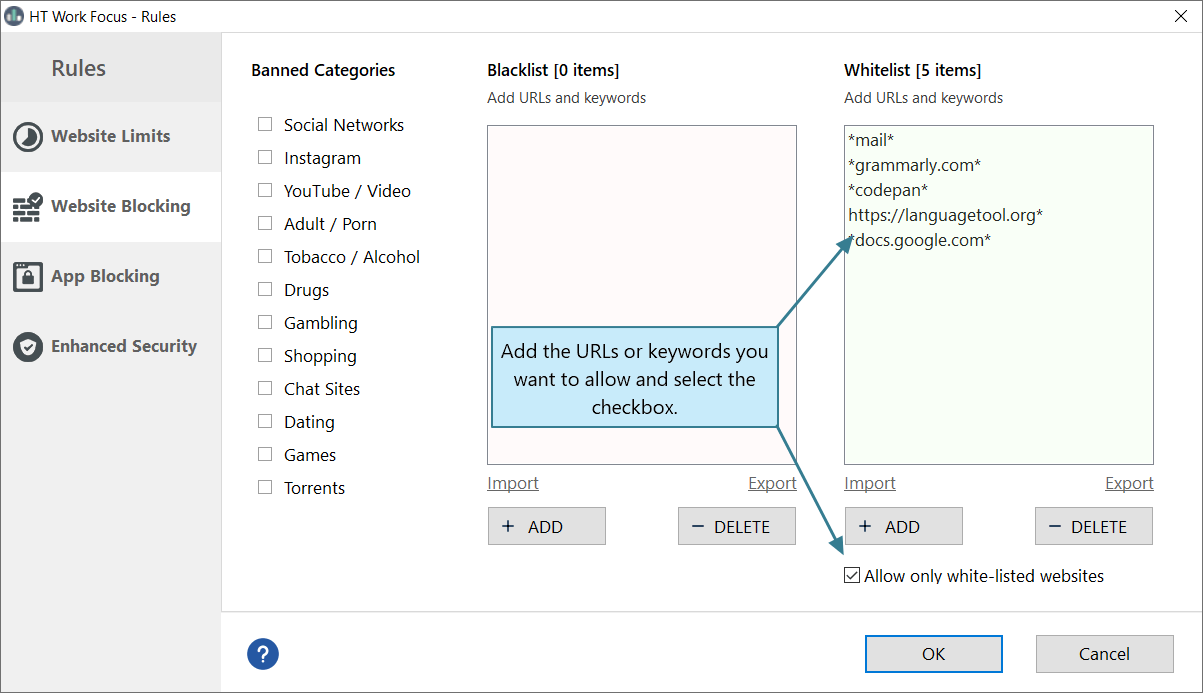
With HT Work Focus, you can allow access to only certain websites and block all others. In this way, your employees can access only approved sites.
- Open Rules → Website Blocking.
- Add allowed websites/keywords to the Allowlist.
- Check the box Allow access only to websites above.
Click to enlarge
– Do not include extra characters like slashes, "www", or symbols that aren’t part of the real web address.
– The safest way is to open the website in your browser, copy the full address from the address bar, and paste it directly into HT Work Focus.
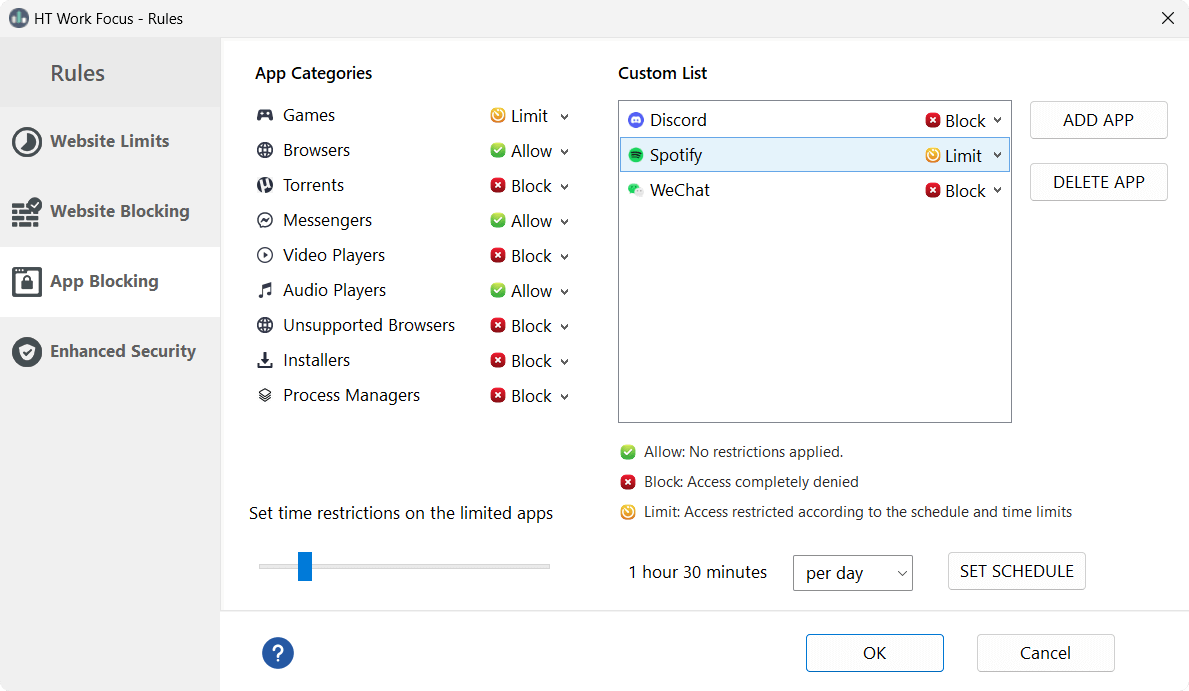
Certain apps can also be non-productive, such as games, messaging apps, video players, and more. HT Work Focus provides you with the capability to block or limit such applications. You can apply blocks or time limits to installed as well as non-installed programs.
- Go to Rules → App Blocking.
- Select Block to completely disable access to certain app categories or individual programs.
- Select Limit to restrict access based on daily time or schedule.
- Use the Custom List to add specific apps and choose whether to block or limit them.
- Adjust the total time allowed per day or click Set Schedule to define custom access hours for all limited items.
Click to enlarge
Block: Access is completely denied at all times.
Limit: Access time is capped per day. The daily quota is shared across all items marked as Limit.
Advanced
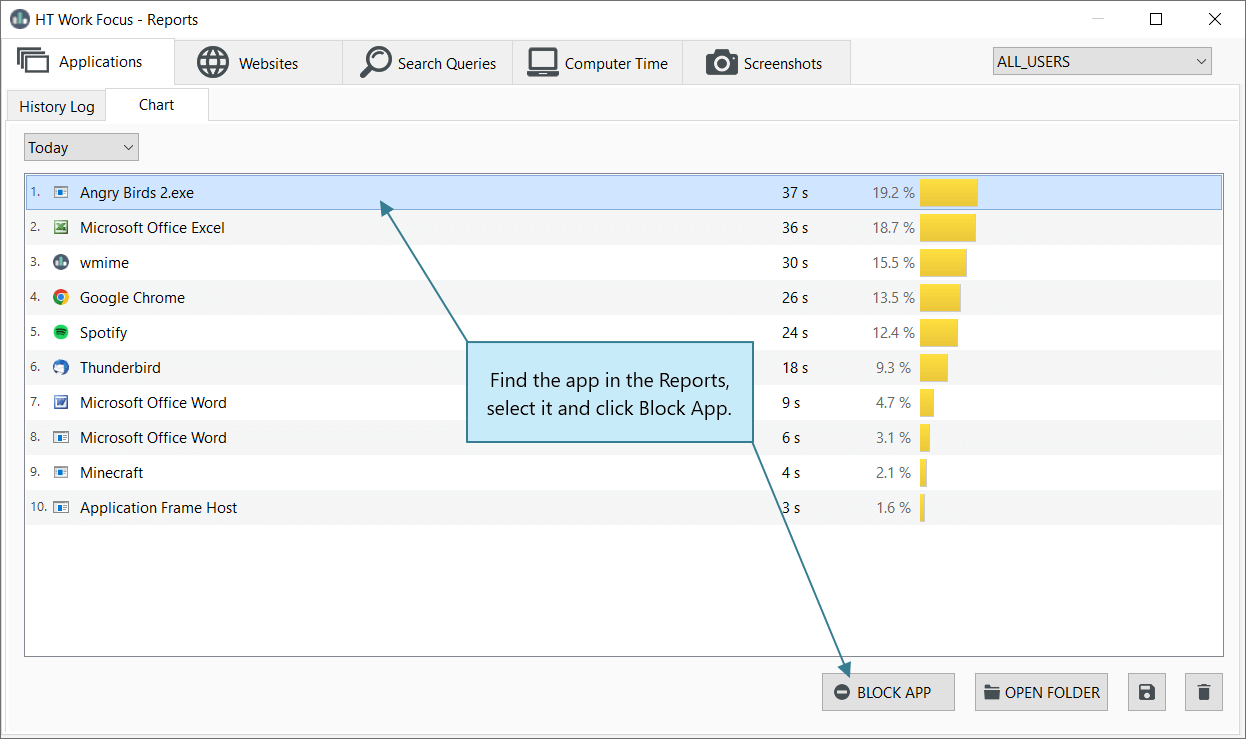
HT Work Focus lets you block or limit distracting activities directly from the Reports view. This makes it easy to identify problematic apps or websites and restrict access without switching tabs. This method gives you an easy way to manage access based on real-time usage data.
- Open the Reports tab and go to Applications or Websites.
- If you notice a distracting app or website in the report, you can block or limit it directly from here.
- Click the app or website to select it, then choose Block or Limit at the bottom.
Click to enlarge
Control when monitoring and filtering are active. Apply time restrictions to ensure productivity during work hours and allow privacy during breaks or after work. For example, you can enable tracking and filtering during work hours and disable them during lunch breaks or after work for privacy.
- Go to Settings → General Settings.
- In the Schedule section, select the mode:
- Monitoring & Filtering
- Monitoring Only
- Filtering Only
- Click Set Schedule.
- In the schedule window, select the days and hours when the rules should apply.
- Click OK to save your changes.
Click to enlarge
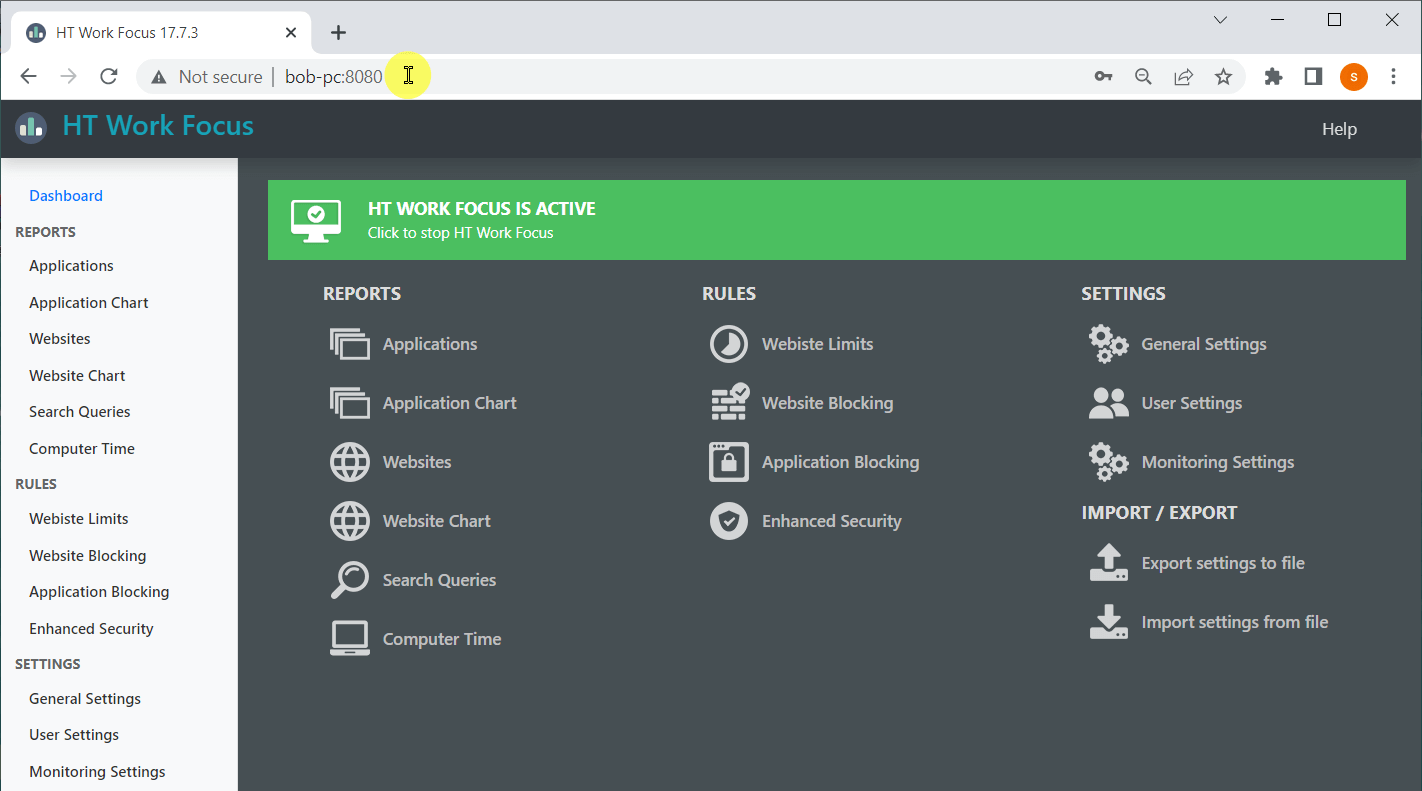
If you’re managing multiple computers within the same local network—such as in an office, school, or home setup—you can remotely view reports, configure rules, and monitor activities without needing physical access to each device. HT Work Focus offers two convenient ways to do this:
- Using a web browser — access each computer’s dashboard directly via its local network address.
- Using HT Remote Manager — a dedicated desktop app that finds and connects to all online devices running HT Work Focus on your network.
Show Instructions for Option 1 (Browser Access)
Option 1: Access via Browser
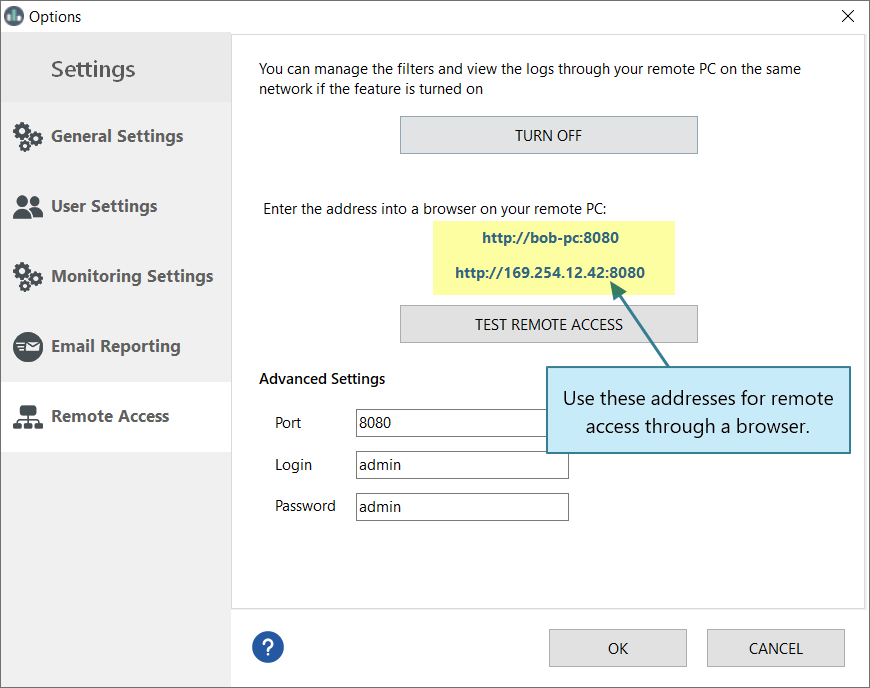
- On the monitored computer, open HT Work Focus and go to Settings → Remote Access.
- Copy the URL address shown in the tab.
- On your admin computer (connected to the same network), open a browser and paste the copied URL. Log in using the default credentials:
Default Login: admin
Default Password: admin
Click to enlarge
Click to enlarge
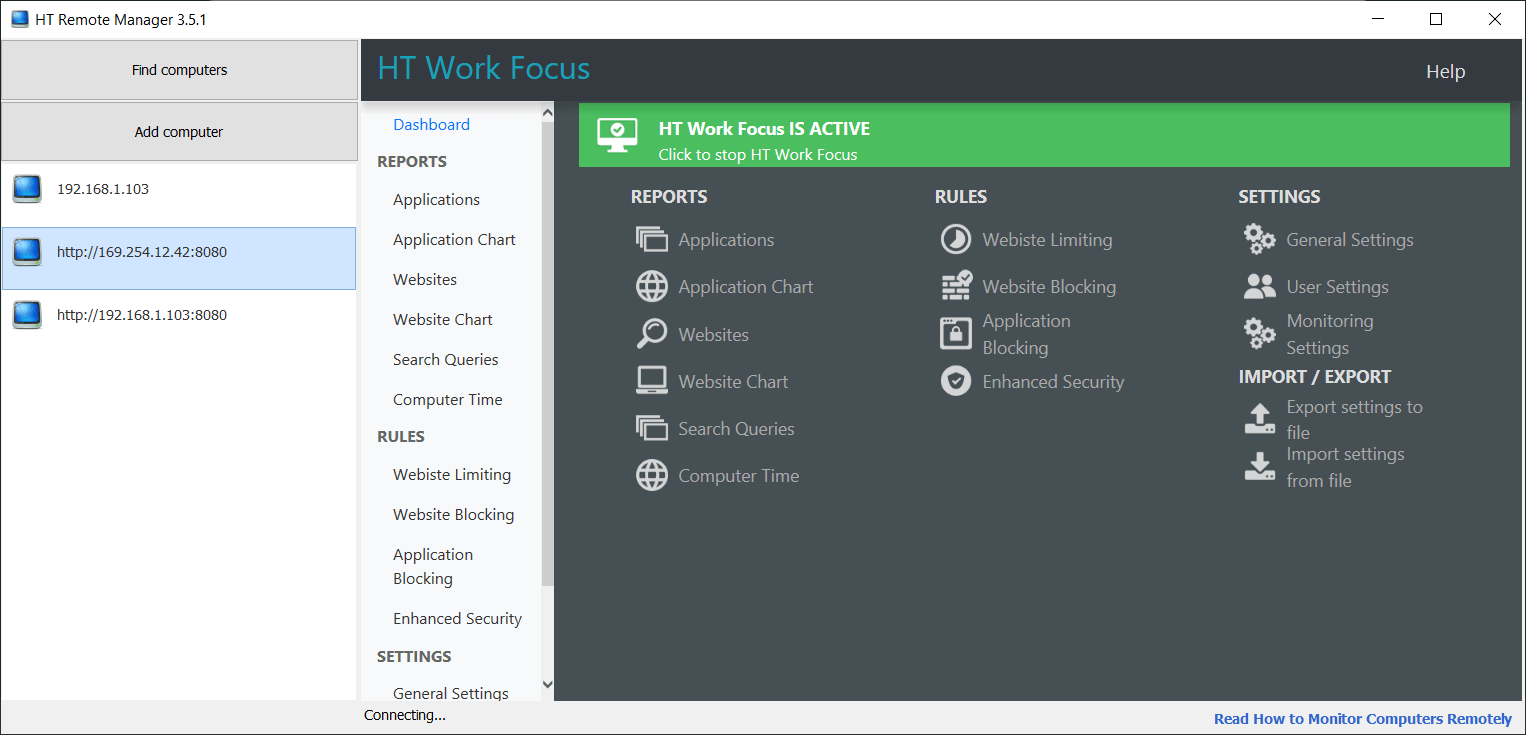
Show Instructions for Option 2 (HT Remote Manager App)
Option 2: Use HT Remote Manager App
- Install HT Remote Manager on your admin computer.
- Click Find Computer to automatically detect all online devices running HT Work Focus on the local network.
- If no device is found, click Add Computer and enter the URL from the monitored device’s Remote Access tab.
- Select the needed computer from the list and log in with:
Default Login: admin
Default Password: admin
Click to enlarge
To manage computers from any location over the Internet, we recommend using our cloud-based tool: HT Task Vector, which includes a secure web dashboard for remote access and time tracking.
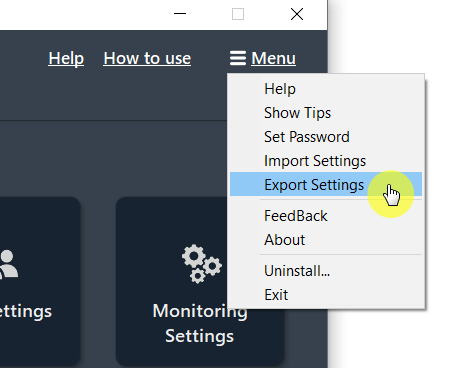
HT Work Focus allows you to configure multiple computers easily with its import/export features.
- Open HT Work Focus on one of the computers and configure it according to your preference.
- Click Menu → Export Settings. Save the file with your setting on a flash drive or send it to your email. Then export it to the HT Work Focus on other computers — Menu → Import Settings.
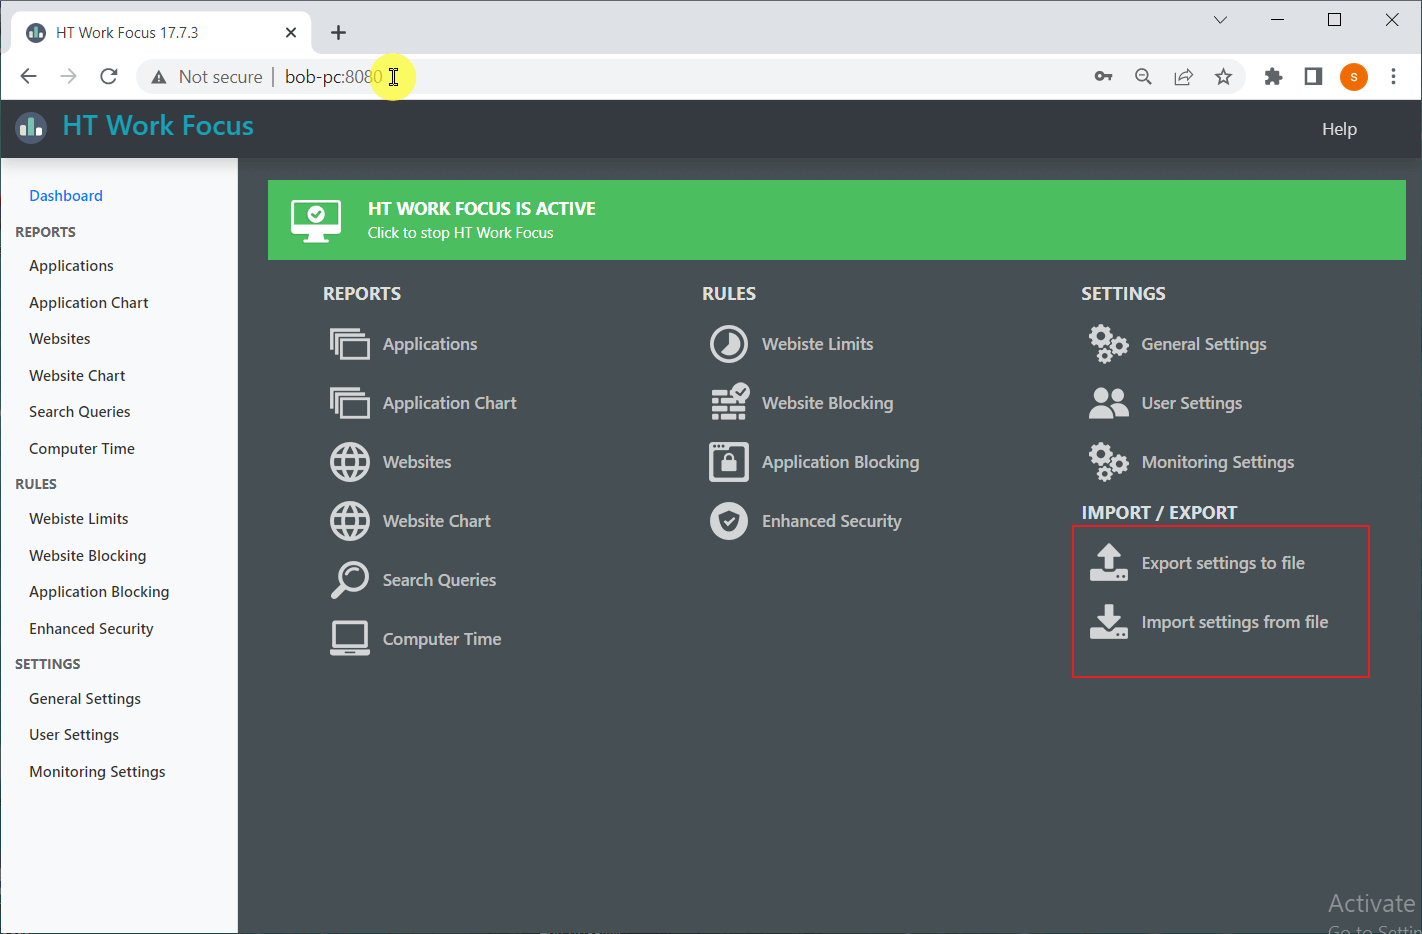
If your computers are on one network, you can do it remotely:
- Open HT Remote Manager, select one of the computers and configure it according to your preference.
- Open its computer dashboard, click Export settings to file, and save the file.
- Select computers one by one and import your settings — Dashboard → Import settings from file.
Click to enlarge
Click to enlarge
Once installed, HT Work Focus keeps track of all users on the computer or terminal server. You can turn on or turn off any monitoring and filter functions for certain users.
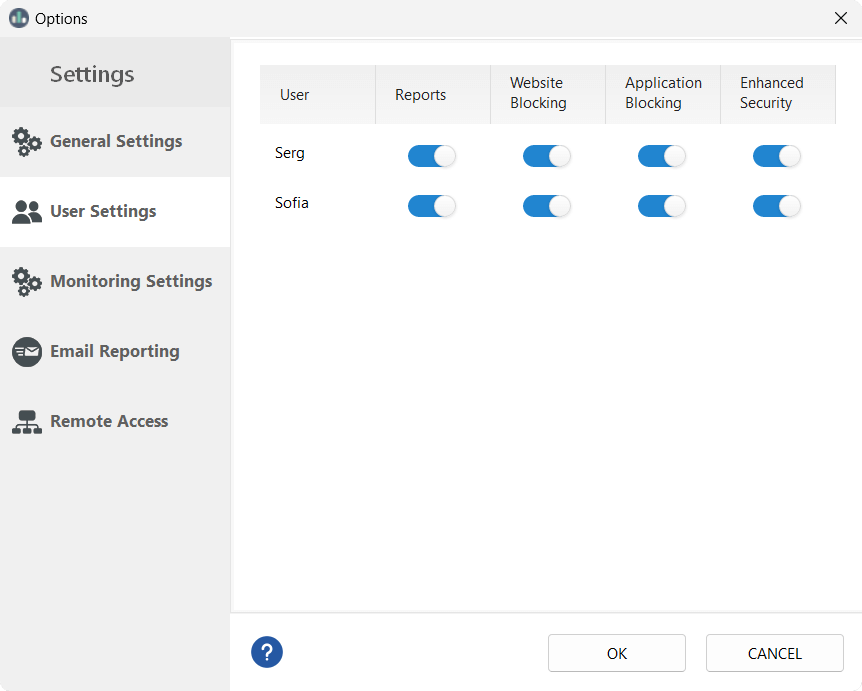
Click to enlarge
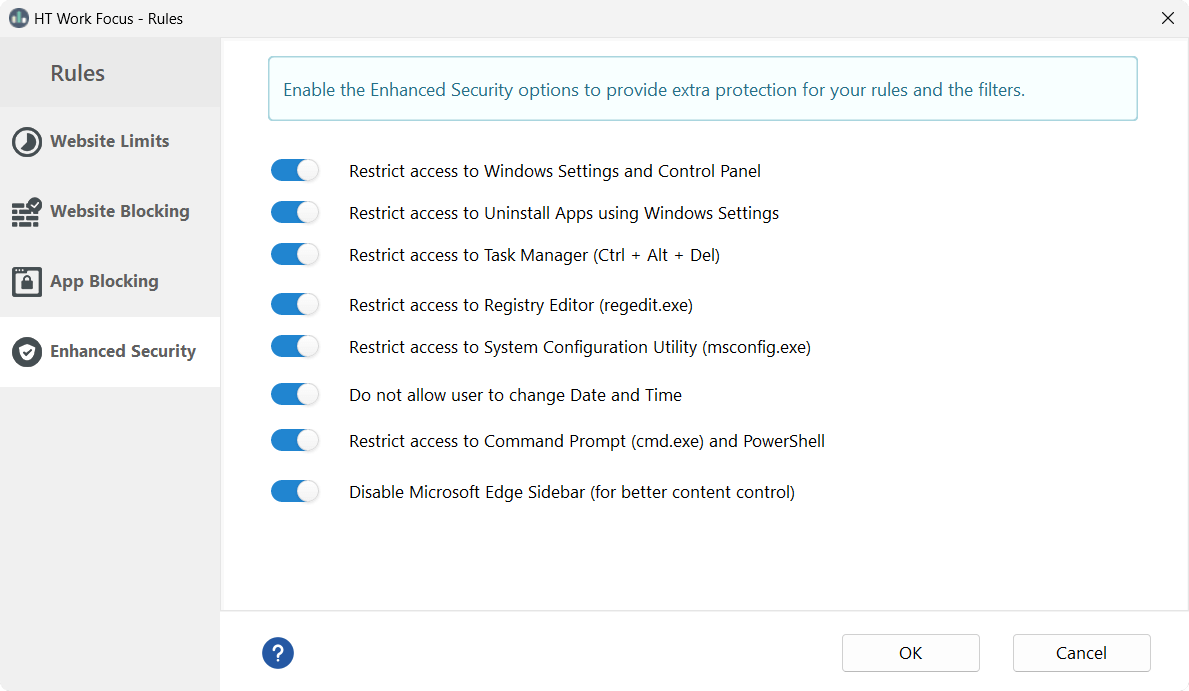
Not all your users can be happy with the restrictions. Protect HT Work Focus and its filters against bypassing with these built-in options:
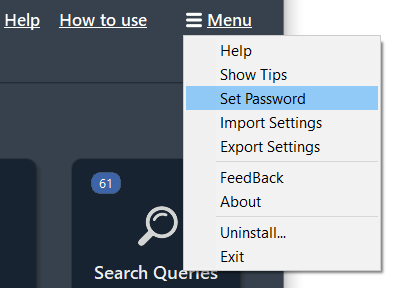
- Set up an access password → click Menu → Set Password.
- Click Rules → Enhanced Security.
- Select Restrict access to Task Manager (Ctrl + Alt + Del) to prevent HT Work Focus from stopping via task manager.
Click to enlarge
If you’ve forgotten your password, you can log in using a fallback method and then set a new one:
- Registered version: In the login window, enter your license key exactly as it was provided — with capital letters, dashes, and no space at the end.
- Trial version: Enter the default password trial2013 in the login window.
- Setting a new password: After logging in, go to Menu → Set Password.
Click to enlarge
Have a question about using HT Work Focus? Need assistance with configuration? Please feel free to contact us. We are looking forward to hearing from you.
Haven’t tried HT Work Focus yet? Download the 14-day trial version!
Liked the time tracker? Purchase the full version!